[00:00:00] Shanna Martin: Thanks for listening to the Tech Tools for Teachers podcast, where each week we talk about a free piece or two of technology that you can use in your classroom. I’m your host, Shanna Martin. I’m a middle school teacher, technology, and instructional coach from my district.
[00:00:32] Fuzz Martin: And I’m her producer and husband, Fuzz Martin.
And a fun fact, I always edit this podcast at 6 30 p. m. because it’s the best time hands down.
You have to think about that one for a moment.
[00:00:51] Shanna Martin: 6
[00:00:52] Fuzz Martin: 30. Yeah. 6 30. The hands are both down on the clock. Yeah. Okay. Right. Okay. Yeah.
[00:00:57] Shanna Martin: Yeah. That was, that was fabulous. Thank you. Good job.
[00:00:59] Fuzz Martin: Thank you.
[00:01:02] Shanna Martin: Oh my. We got jokes. We got jokes. We are here. Episode 193. Mm hmm. In the middle of October. Yeah. Chaos. Spooky season.
Spooky season, yeah. Parent teacher conferences. A thousand other things going on. You know, just a thing or two. Homecoming for some. Yeah. Other activities, we’ll have Red Ribbon Week coming up soon. I’m presenting at the MyPITA conference coming up at the end of the month. There’s so many things, so many things going on.
So we have a fun little quick tool to share today. And if you haven’t guessed it, it has to do with.
[00:01:41] Fuzz Martin: Time.
[00:01:42] Shanna Martin: Time after time. It is a timeline creator, which I love one of these, and they can be used in so many different content areas. So we’re talking about time graphics, time graphics, and my five highlights.
Yes. First time graphics. Then I’ll go into all the different things you can do with it. ’cause it’s a pretty cool tool. It is.
It’s very easy to navigate, like you click the create button. First of all,
[00:02:15] Fuzz Martin: it’s a timeline. It’s a
[00:02:16] Shanna Martin: timeline creator. Yes. So it’s a timeline builder. And it is super easy to navigate. So it is, you click create, you make one. Yay. There’s lots of tools within the timeline creator to build things. And they’re not hard to find.
Like, you don’t have to search for stuff. There’s just like this little wheel and I’ll, and I’ll kind of talk about it, but you’re like, add a video, add an image. Add your things, add your information, add a graph out of Google, like everything, just like pull over everything’s from your Google Drive. It’s pretty sweet.
Build your timeline. Boom. You can upload all your own images and your own information, which is really helpful, especially if kids are doing like research projects or sharing like family timelines, whatever they want to do. You can download it in a variety of formats, so you don’t just get one way to download, you can download it in a bunch of different ways when you’re done with it, and it’s really easy to share with others.
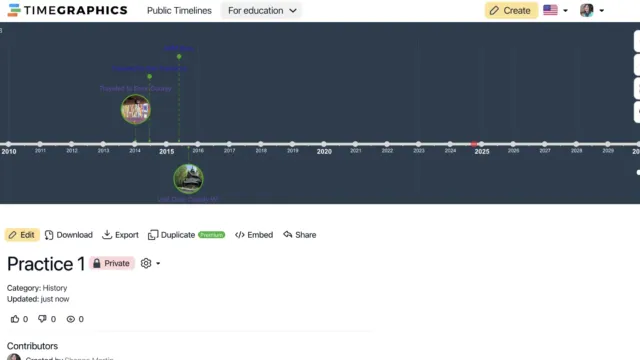
So it’s a pretty cool tool, and it has lots and lots of options. So let’s talk about officially timeline creator. So time graphics is what it’s like, what you go to when you’re pulling up the website, the link that you’re going to want it’s time dot graphics. So T I M E dot graphics, G R A P H I C S.
That’s all you need to get to it. They have their free timeline maker and you get a couple of free ones and then they have like the upgrades to premium and things like that. But. You know, you can make things work as you need to. So you get two for free and then you go from there. And when you get the screen pulled up, it’s really easy.
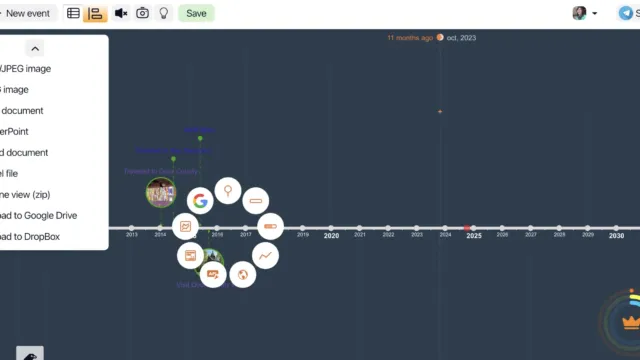
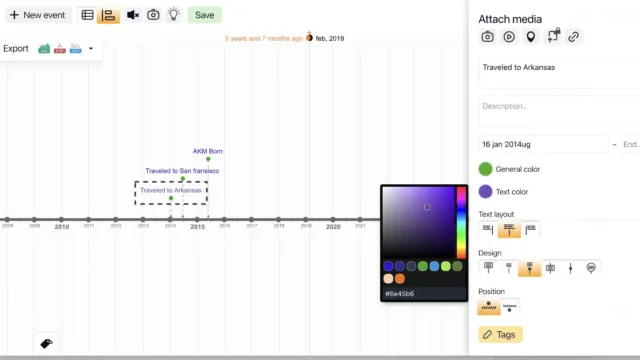
You just like upper left hand part of the screen says new event. When you click on it, you get these little, like this little round circle of more circles, circle of circles, but that’s where all your tools are, which is cool, just lands right on your timeline. And so then. You can add your event. When you do, you then have the option of adding pictures.
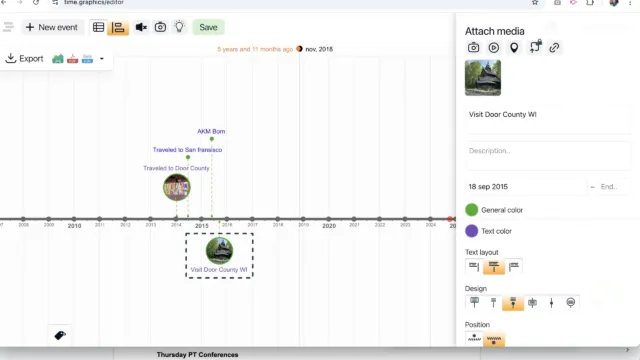
Like I said before, video images. You can drop in Google Map information. You type in what your event is. You type in your description. You put your date in. It then gives you the option for general color and then text color. So when it’s building the timeline, it starts with like years. And you can zoom in, zoom out as you’d like to.
And so like right now I’ve got my like generation, like the general color is like the lines and the circles. And then my text is a different color. Then you have the option to change out your text layout. So if you are particular about your timelines, I know some people like the line and the text of the left or the text above or the text, the right, like you can choose where that stuff goes.
Then there’s different designs for like, do you want your text above a little dot? Or do you want a box for your text? Or do you want just the line or there’s different like little bubbles? I’m doing the little bubbles position above or below your timeline. You can tag everything, duplicate it. All of it’s right there.
And you just like type in your information. What do you want? And then once you click off of it, boom, it’s there, which is really cool. You can zoom in and zoom out. So they have the options. There’s a little plus and minus on the right hand side of your screen. You can zoom in, zoom out. You can also like
[00:05:22] Fuzz Martin: pinch to zoom in and out as well.
[00:05:25] Shanna Martin: Yes. Like you can like in a regular document. And then when you go to, like add another event, you have those little circle options again. So it’s cool about, you could add. Just add information to your event or add your media into your event. But also in those like little circle of options, if you hover over the Google things, it will show you that you can import information from Google analytics, which is awesome.
You can import information from a Google calendar and you can import information from a Google spreadsheet. So it can pull your information that you already have in your Google drive. To then like create the things on your timeline,
[00:06:04] Fuzz Martin: which is
[00:06:05] Shanna Martin: cool. And then there’s like grouping of information. So you can add a group of events in your timeline.
And then you also have options for, just all kinds of data. Like you can add just all kinds of data to your timeline. There’s just more and more options. I think the analytics thing is pretty cool depending on what you’re using it for. So there’s just so many choices for attaching media and dates and, and color coding and, I don’t know, I just added stuff like project complete and then like the bar graph of revenue just dropped in there, like there’s just so many different things like, and there’s more information putting in there.
So what’s really cool about it, if you’re having a student’s work through, I love a good timeline with my students. But you can use them for so many different things. So you could have a kid timeline their life. If they’re doing a personal narrative, which a lot of our kids are doing narrative writing right now, they could timeline out the narrative information, like an ELA.
In social studies, we timeline, timeline out events. We’re talking about Wisconsin history stuff right now, like Peshtigo Fire or, the Oakfield Tornado or things like that. Like kids can timeline out actual events in history. In science, you can have them timeline out very various things, depending on like scientific discoveries and things like that, math, if they’re going to pull like data and analytics, they can do all that.
So there’s just so many different ways to use these like timeline builders. And this one’s really cool. It’s very easy to use. It’ll connect to your Google drive, which is nice. And then when you go to export the information, you can pull it as like a. JPG, like a JPEG image, um, a PNG image, PDF, PowerPoint, Word document, Excel file.
You can download your Google drive. You can upload it to Dropbox. Like you have all of these options to share it as well, which I think is cool. And you can just click view. And you can see how your timeline lays out, which is pretty awesome. If you just want to see how things are. You also have the option to embed it, and share via, like, email or just copy the link and share it with other people.
And you can make them public or private. So, there’s just a lot of options when it comes to, like, building this timeline creator. And it would be an easy way to get kids, older students, I’d say, Probably 6th grade on up with this one, 5th grade might be able to use it, but, when they’re going through to create, there’s just a way to like crank it out, or as a teacher, if you want to do something as a class, it’s a great visual, kids could have information, you could be leading it as a class, and build the timeline together.
So there’s just a lot of different ways to use the timeline. And make all of those things work, which is awesome. Are you building as you go? I can see you building, I was building the, uh,
[00:08:46] Fuzz Martin: the timeline of the tech tools for teachers podcast.
[00:08:49] Shanna Martin: Nice.
[00:08:49] Fuzz Martin: Yeah. Which, uh, started five years and nine months ago.
[00:08:53] Shanna Martin: Oh, that’s fun.
[00:08:53] Fuzz Martin: Yeah. In our kitchen. Aw.
[00:08:56] Shanna Martin: It did. In our kitchen counter. On our old
[00:08:58] Fuzz Martin: baby blue countertops.
[00:09:00] Shanna Martin: We’ve come so far. We’ve come so
[00:09:01] Fuzz Martin: far.
[00:09:04] Shanna Martin: But yeah, so time. graphics. It is a super cool. Timeline builder.
[00:09:11] Fuzz Martin: I like that I was able to just jump in and create without having to create an account.
[00:09:16] Shanna Martin: Yeah.
[00:09:16] Fuzz Martin: And, I was able to just start making stuff go.
[00:09:20] Shanna Martin: Yeah. Which is really cool. Cause that’s the other piece too. Like if you don’t want to, if you don’t want to download, you don’t need to download it. If you’re just like building in class or need a visual for kids and you’re maybe you’re like want it to manipulate it in your class, you know, on the wall, like those types of things, you don’t have to.
Download it and save it and all that kind of stuff too. You can just create with it and work on like chronological order of things, which is always like the big, like, what does chronological order mean for kids? And then this is how it looks to have that visual with them, which is pretty cool. So. Yeah, there’s just a lot of cool things about time graphics that allows you to do stuff.
So there you go. And
[00:09:58] Fuzz Martin: it keeps on ticking into the future. It
[00:10:00] Shanna Martin: does. And there are also public timelines too. So if you like love a good timeline, there’s been timelines created by other people, which are pretty fun that you can kind of go and dig into as well. So those are options for you to look into. So there you go.
Time graphics, a quick little time saver. In your classroom in the chaos of October.
[00:10:22] Fuzz Martin: Yeah. It’s, you know,
[00:10:25] Shanna Martin: it’s kind of fun.
[00:10:25] Fuzz Martin: Yeah. I’ll save you. It’ll save you a little time.
[00:10:28] Shanna Martin: It will. Thanks for tuning in. This has been the Tech Tools for Teachers podcast. If you ever have any questions, you can find me on the app, formerly known as Twitter,
[00:10:38] Fuzz Martin: Elon’s thing,
[00:10:39] Shanna Martin: At smartinwi or on threads.
And if you want to get more information on the links to the technology discussed in You can visit smartinwi. com. If you’d like to support the show, please consider buying me a coffee or two. Visit buymeacoffee. com slash smartinwi or visit smartinwi. com and click on that cute little purple coffee cup.
Your donations help keep the show going. New episodes each week, most of the time. Thanks for listening. Go educate and innovate.
[00:11:06] Fuzz Martin: The ideas and opinions expressed on this podcast and the SMART NWI website are those of the authors, Shanna Martin, and not of her employer. Prior to using any of the technologies discussed on this podcast, please consult with your employer regulations.
This podcast offers no guarantee that these tools will work for you as described, but we sure hope they do and we’ll talk to you next time right here on the Tech Tools for Features Podcast.
Bye.

